|
Introduction
(Revised)
Welcome to “Mean Sets!” Whether you have one or several of the available models, most of what you need to know to complete assembly should be right here.
The tools and materials needed are simple and inexpensive. Because each Set is printed with full color, photographic textures, nothing more need be done but
finish assembly, put your miniatures on the Set, and shout, “Dice, Camera…. Action! ”
General Ideas And Suggestions
All “Mean Sets” have been designed for fast, simple construction and are well within the skill levels of most neophyte modelers, and will be "old hat"
for the veterans.
When Printed versions of the models are bought,they have been produced on heavy card stock, and are ready to go. If PDF's
have been bought, they will, of course, require printing, and this should be done on at least 110# matte white card stock (easily available from any Office
Supply store). Ideally, glossy inks should not be used, but if so, the finished product can always be lightly sprayed with a clear matte fixative.
Materials and tools needed include glue, a good pair of scissors, cellophane tape, and a ruler/straight edge (preferably steel). The building designs
require the use of 3/16" inch thick foam core board (cheaply available at any craft store) for reinforcing walls and floors. Comparable materials may be
substituted, but the 3/16" thickness is a must. Foam core can also be bought in a black--with the same color solid through-- --that is especially
effective for adding a very "finished" look. A paper cutter will be very useful for accurate cutting of longer and larger foam core pieces.
You will need a hobby/craft knife (such as X-acto®), and some extra blades will be a plus. There are many doors and some windows that must be cut out.
Where indicated, solid lines should be cut through. These card stock models also require a great deal of “scoring” in their construction. That is, drawing
the blade along the dashed lines (preferably with the help of a straight edge) that appear at fold points, but lightly so as not to cut through.
A "scoring tool" will also be very helpful and more reliable for the specific purpose than a knife. You might prefer to get one such as used by scrapbook
and paper craft hobbyists when buying your other items at the hobby/craft store. They are inexpensive, provide a good score line, and are unlikely to cut
through the card stock.
The other indispensable item is the glue. This modeler has had good results with simple PVC ("Elmer's White"), but others may prefer Glue Sticks (such as UHU),
brushable rubber cement, or even spray adhesives for the larger jobs, such as floors/foundations to foam core bases). Double-sided tapes will also work in some
instances, but a good "spot" glue like PVC is hard to beat.
The biggest concern with water based glues, and perhaps some others, are "warping" issues. One advantage of using foam core is that warping is less likely,
certainly when compared to other paper/card board materials. However, as mentioned below, putting each freshly glued wall, floor, or other component
under a heavy weight before moving on to the next will avoid virtually all danger.
The techniques of assembly are pretty straightforward, requiring little more than cutting out or scoring the walls and other pieces, folding, gluing,
and mounting. Modelers are encouraged to use an extra sheet of matte or foam core board as a good cutting surface to protect the top of your work area.
Simply lay it down and do all your detail cutting on top of that. When the extra sheet gets worn out, it can still be cut up for future use on other projects, so
there’s no waste involved. There are also green cutting mats that are designed for this sort of use and will provide good use for years.
Sometimes, just looking at a 2D sheet of printed pieces does not suggest what the finished assembly should look like, so don’t forget there are color
photos on the “Mean Sets” Photo Page.
Getting Started
The best way to get started with any “Mean Set” is to take each printed sheet and perform all necessary scoring first. Again, a straight edge is almost
a necessity for a proper job of it. By scoring now, a great deal of trouble and time will be saved later. Since even the most experienced modeler could
score a fold line too deeply and cut through, but not notice until later, another good idea is to use cellophane tape to reinforce the scores from the
back side of each printed sheet after all scoring on that section is done.
Notice that some floors have white side tabs along one or more sides. These are not to be scored or folded, but glued flat on the base and the appropriate
walls mounted on these spaces later.
After scoring, cut out the floor section(s) and glue to a Base of foam core cut to the appropriate size and shape. When finished, set aside to dry and
stack some heavy books or the like to prevent warping. 
Next, begin cutting out the wall sections using your scissors or paper cutter. Some will have tabs at the ends or bottoms for connecting to the floor or
other walls. Most wall sections will have a black tab running along the tops and/or ends. These are to be scored for folding and gluing onto the foam core
sections you will place between walls. These black tabs provide a “finished” look that covers the rough cut and plain tops and ends of the foam core.
You will also notice that wherever the card stock has been cut and/or folded, the white edges of the material are quite obvious and can detract from the
look of the finished Set. Take marking pens of the appropriate color and cover these now while they are most accessible.
Some wall sections have white end tabs that connect with the next wall section in line. It is a good idea—but not absolutely necessary—to go ahead and
connect them now. This can produce an “accordion” looking chain of walls which allows the modeler make sure each piece lines up exactly.
Also, some walls have “texture extensions” on their fronts. These are additional lengths of matching wallpaper/brick/flooring/etc that are meant to be
folded around and glued to the adjacent walls or floors and cover the “seams” or angles were these meet. Do not glue these extensions until you reach “Final
Assembly” (below).
There are doors printed on some sheets in every Set shown as front and back sides. Cut these out now, score the dividing line between halves, and the
white “hinge” tab. Fold the halves over, glue, and let dry (under a flat weight) for future use. Similarly, there are some windows that will be set into
spaces later cut into walls. These should also be assembled now so as to be dry later.
Some walls are “single-sided,” while others have two different sides with a lack top tab between them. These require being scored along both sides of
the top tab (indicated by a dashed line). Some wall sections have white bottom tabs. These are to scored and folded under the wall and glued to the
Base. Also, some walls back and side walls have doors already printed on them, but these are not meant to open (but may be so modified if desired).
Finally, some walls are not only “double-sided,” but are connected to floor sections. Again, only score at these fold points. In these cases, the floor(s)
will be glued to the Base previously cut.

Backing The Walls
The walls in every “Mean Set” have been spaced to allow a standard 3/16” piece of foam core to be glued to its back or between “double walls.” This
imparts a fully 3D effect to doors and windows, besides giving strength and permanence to your work. These sections should be measured and dry fitted
before gluing, including folding the black top and end tabs into place. If a wall section has no doors or windows, place under the same weight as the Base
while you work on the other assemblies.
If several walls have already been connected into an “accordion,” be sure that when mounting the foam core to their backs
enough space has been left for the individual sections to “hinge” and form the necessary right angles.
Preparing door and window frames is the “trickiest” part of the entire project, so follow closely.
The doors are meant to be able to open and close within their printed frames on the wall. To do this, you should have already scored the interior door
frames indicated by dashed lines on one side of the wall. On the opposite side will be a empty door frame. Glue the pre-measured foam core piece
to the black top tab. When it’s sufficiently set, fold both wall sides down, but do not glue them yet.

Take the appropriate door and glue its “hinge” tab into the inside surface of the empty door frame. Make sure that the door is very slightly higher
than the bottom edge of the frame so that it can swing easily, and that it’s lined up to meet the frame edge so it will close properly. You may wish to very
lightly trim the bottom or side edges for a good fit. Now, fold the door wide open, flat against the wall.
Turn the wall over and fold the scored door frame pieces flat to the outside surface of the wall. Both sides of the frame should now nothing but foam core
on either side. Now, carefully cut out the foam core visible in the door frame. You may find you have better results doing the side cuts from the top of the
door going down as this will minimize the chance of “over-cutting” and damaging the section of the building above the door on the model. One deep cut on each
side and along the top should do the job. Once you’ve removed the piece, make sure everything fits, then glue both sides of the wall to the foam core. Put glue
on the inside cut surfaces of the door frame and fold the previously scored door frame sides and top in place. It doesn't seem to matter if the card stock or
foam core should actually take the glue, but too much is as bad as too little.
Windows are similarly done in that they need to be cut out, and where frame sides are shown, they are to be folded into the space. In some cases, windows
will not show interior frame sides, but will have strips of matching texture to be glued in place all around the interior of the frame.
Due to the nature of having “3D” walls, the spaces directly under the door frames are exposed and show no textures at all. Therefore, short floor
extension pieces have been provided for each floor texture in the Set. Cut these out and glue them in place before gluing the walls down. Be sure
that the right extension is going under the right door frame!
Final Assembly
When all the walls have been backed with foam core, begin gluing them down where indicated on the floor section. If one or more wall sections have
"texture extensions” (see above), now is the time to glue them to the adjacent walls. These may be trimmed to fit, or discarded if not wanted.
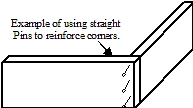
Another construction option is using straight pins to hold one glued wall section to another. This greatly strengthens the overall assembly and prevents
further shifting or warping as the glue dries. While flat headed pins are fine (or even steel pin with no heads at all), using those with a “bulb” shaped head
(such as infect newly bought shirts) provides the benefit of resembling light bulbs. Notice that on some walls, there are flower shaped “fixtures” that
will take these pins, providing bracing where needed, but also a nice architectural detail.
Some Sets come with a variety of sub-assemblies such as the bars in the Restaurant and the Speakeasy/Bar. These should be added after the walls go up.
Other sub-assemblies include furniture or fixtures. These may be put together last, or not used at all. Sources for a great many excellent accessories
(everything from pull-chain toilets, to beds, candle-stick telephones, wall clocks, etc) are available from the vendors whose links appear on the Web Page.
The decision whether to glue down furniture and fixtures is entirely up the modeler, though their light weight means they will be wandering all over the
place during play! Permanently fixing them to the Set is a great convenience and perhaps well worth the loss of variable placement. But that’s up to you!
Once all the walls are in place, it’s a good idea to put those books back on top of the Set to prevent warping, ideally overnight. Since "Mean Sets"
do not require roofs or top coverings of any kind, there is no need for concern about placing any.
Don’t hesitate to report any problems you may encounter with a design. A problem easily overlooked by the designer might not escape the watchful eye
of a Modeler! Any necessary “fixes” will be made and replacement designs provided gratis.
So, now you’ve done it! While each “Mean Set” provides its own unique design features, the lessons learned from your first effort, and these notes,
will make each subsequent assembly easier, faster—and more fun!—than before. Let’s see your photographs, too. There’s always room for improvements and variants,
so don’t hide them!
Patrick Wilson, TVAG
November, 2010
|