|
|
B'hoys Towne!
City Buildings for B'hoys!
or other Victorian-era Gaming
|
|
Introduction
by Patrick Wilson
| |
B'hoys Towne is a representation of buildings and businesses representative of New York in
the period between 1830 and 1865. Many of the architectural features are common to other more or less contemporary cities,
both in the United States and Europe. Some buildings which served as inspiration are still standing and in use to this
day with little outward changes.
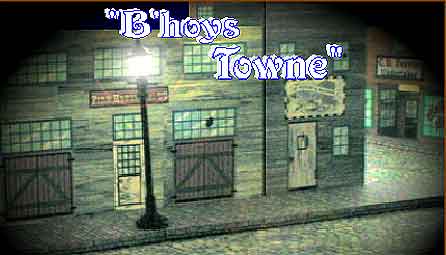
"Where the Streets Were Never Meaner"
In the period before iron or steel were widely available,
most of the buildings represented were wooden frame and rarely
reaching above four or five floors. The ground floors of most
were utilized as businesses of all kinds, while the upper floors
might be living space for the proprietors. Most frequently, these
upper floors were apartment spaces, the owner collecting rents.
Most “apartments” were of two rooms with windows only
on the front. Neighborhood wells or occasional “back yard”
pumps were the only sources of water for the inhabitants, and
sewage was simply dumped to the property's rear and and front.
Pigs roamed the streets by day, living off the trash that could
be piled feet high all along the streets, adding their own offal
to the mix.
Gas lighting, while available for street lighting or in the homes
of the well-to-do, was rare in most of the building types represented.
With interiors dark as mines, redolent with the smells of unwashed
people, raw sewage, stale food and garbage, they were not “lived
in” as such. Inhabitants returned home only to sleep and
cook such food as they had. And still, for most of the emigrant
population, primarily Irish, these otherwise intolerable conditions
were as superior from Home as Heaven from New York.
In all weathers, it was better to be outside than indoors. Thus,
the streets were always full of men and women, most without any
real employment, whose idle hands and frustration were the fuel
for the casual, everyday violence which characterized the Gangs
of New York.
Some General Advice
White glue, good scissors, and a craft knife for scoring are the
only necessary tools. Would-be builders are strongly encouraged
to use foam core (or “feather”) board to make Bases
and to back and brace the walls of each Block. Use glue sparingly
so as to avoid warping of walls, and it is a good practice to
let walls backed with foam core dry flat under a weight for the
best result. A product called “Perfect Panels” using
an all purpose contact cement is also well suited.
Each Block is uniformly 2" deep, and vary in length between
9" and 10." It is advisable to measure the length of
the Block in question, then cut out a foam core Base to match
the specific dimensions. The Base will fit "inside"
the front and side walls when assembled. Ideally, the entire interior
surface of the three walls of each block will be backed with material
to stiffen and strengthen the whole. The back of each Block is
designed to be open. For those wishing to cut out doors and windows,
mounting platforms for figures to stand on will be necessary.
For those not so inclined, it may be desirable to use matte board
or other material to close up the Blocks from behind.
Most Blocks will have extra window sills, cornices (decorative
stone or other pieces above some portion of the building front),
door frames, signs, dormers (small roofed and windowed extensions
appearing on the main roof), etc. which may be used or not as
desired. If applied, they will add a greater sense of dimension
and weight to the final product. Matte board, and even balsa work
well for mounting these features. Study the building faces and
look for any matching parts which may be glued over them.
All Blocks at various points show dashed lines. These are “score”
lines for the craft knife. Without cutting through, lightly stroke
the blade along them using a straight edge, thus allowing them
to be easily folded. The Tabs for gluing walls and other parts
together will also need to be scored. It is another good idea
to “dry fit” pieces together to be sure of their alignment.
Several buildings have “basement” windows which require
cutting out the spaces indicated in the foundations and mounting
the assembled windows back, inside the walls.
The street sections show double score lines at the edge of the
sidewalk. When properly scored and folded, a 3/16” curb results.
This measure is common through all the Blocks and important as
it is the thickness of a standard sheet of foam core board. Without
cutting them apart, and gluing foam core underneath, the streets
and sidewalks become “3D,” for much greater visual impact.
By abutting or overlapping the sections, streets can be made to
any desired width and length. If mounted on foam core bases of
sufficient width and length, permanent streets can be made. Completed
Blocks of buildings can then be glued (or not!) along the outboard
edge of the sidewalks, and multiple Blocks can be abutted directly
end-to-end for as long a distance as desired. Narrow alleys, intersections,
and street corners may also be created. With some forethought,
a modular series of streets can be created for the maximum variety
and flexibility.
Some styles of “Christmas Village” type street lights
(including those that light) may be added. In the better neighborhoods,
trees or shrubbery could appear along the sidewalks. If your space
is used thoughtfully, some buildings may be set farther back from
the sidewalk and fenced front yards added (particularly effective
for the Police Station and The Metropolitan Hotel).
Finally, don’t be afraid to add other features to the some
of the Blocks or buildings (e.g. porch lights) or to make more
ambitious modifications or additions. B’hoys Towne is now
YOUR town!
Patrick R. Wilson
February, 2003
|
|
Block-by-Block
Assembly Instructions
by Richard Houston
|
|
|
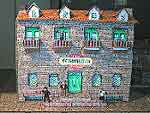
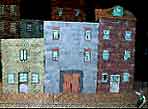
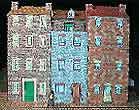
BLOCK 1
The Mariner’s Rest, Smokem & Hakkem, & O’Doul’s
Pale Ale Palace
Cut out front of building. Cut out basement windows in foundation
of left end building. Cut out basement windows, fold and glue bottom
tab first, then top tab, push in the rock sides and glue inside.
Fold bottom tab along Block front and glue to base. Cut out Block
sidewalls, score, fold over, and glue top edges to back. Line up
tab sides with front and glue. Glue short side wall to Block front,
fold long rock side to matching inner wall, then glue to front wall.
Cut out roofs (flat and gabled), and glue on. Cut out steps, assemble,
and glue where indicated under Mariner’s Rest door.
|
|
|
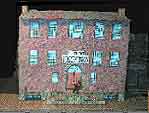
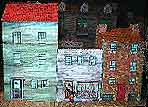
BLOCK 2
Money Lender, “Rooms,” Stanwix Hall
Cut out Block front, then score, fold over, and glue top edges to
back for both left and center buildings. Cut out base and glue under
front. Cut out block sides, fold chimney into a rectangle and glue.
Fold side tab and glue to front wall and base. Cut out long end
wall of building, score, fold over, and glue top edge to back. Fold
wall tab and glue to front and base. Fold and glue chimney, then
glue this Block end to front wall. Fold roofs, glue together and
glue to front and side walls. Glue slope roof on one end, then the
other. Glue on chimney tops. |
|
|
BLOCK
3
Grocery, Oyster Bar, The Gem
Cut out Block front, then cut out door entrance of center
building, and glue to base. On same building, score, fold over,
and glue top edge to back. Cut out recessed door/floor section,
score tabs to make assembly, then glue floor flush with front of
building, push in sides of entrance in main wall, and glue in place.
Cut out and fold both outside walls and glue to front and base.
Cut out inside walls and glue to front wall, cut out flat roof and
glue to front and sidewalls. Cut out slope roof, fold and glue all
four sides under and glue, brown on left side, red on right. Cut
out dormers, fold, assemble, and glue to slope roofs. Fold front
edge of dormer roofs under and glue, then fold to dormers. |
|
|
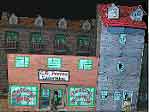
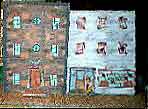
BLOCK
4
Theater
Cut out front of building. There are two sections, one
for the ground floor, one for above, and glue together. Cut out
arched front section. Score the arches where indicated and fold
back. Bracing with thin strips of foam core is advisable. Cut out
green roof and fold all four sides up, glue front edge and two sides
to top of arched front wall, fold arch tabs under, line up with
front of checkered floor and glue under the parquet floor. Cut out
base and glue floor and back wall to it. Glue wall side of green
roof to back wall, under the first row of windows. Glue on roof
section at top of building. Fold the gated wall extensions with
sidewalks forward, then glue to floor base and inside of main building
back wall. Choose whatever title sign desired and mount above arches
between 2nd and 3rd floors. |
|
|
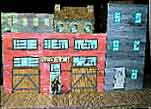
BLOCK 5
The Metropolitan Hotel
Cut
out front wall, then cut out first and second story windows and
doors, and the basement windows. Using the black lines marking the
folds as a guide, fold all doors and windows of the front wall in.
By cutting the outline at a 45° angle at each corner, you can
flip it over and fold with a straight edge. Cut out one window and
door to see if they will slip into the opening, push then into slots
from the front and glue. Cut out base and glue front of building
onto it, cut out each basement window, then glue in place starting
with lower section to base, working up and over. Cut out balconies,
fold up side the sides and glue bottom portion under “portal”
opening in the front wall. Cut out railings, glue front middle section
to balcony, then the sides. Bend ends out to glue to portal sides
of outer wall. Cut out the large sidewalls and glue chimneys making
sure they are rectangular. Cut out roof, then dormers, and glue
them to roof as indicated. Cut out dormer roofs, fold down front
edges and glue, then mount the roof to one end of the building,
then across the front to the other side. Glue on dormer roofs and
chimney tops. Cut our front steps, fold and assemble, then glue
to stairwell wall, then mount to building front where indicated.
|
|
|
BLOCK
6
Police Station
Cut out Block front, then open the basement window spaces
in the foundation. Cut out base and glue Block front to it. Cut
out and assemble the basement windows, then glue bottom tab to base
and fold over before inserting side and glue inside the foundation.
Cut out large side walls, making sure chimney folds into a rectangle.
Glue these end pieces to front wall and base. Cut out roof, glue
to one end, then glue across front to other side and glue. Glue
chimney tops in place. |
|
|
BLOCK
7
“Beds,” Hole In The Wall, The Green Dragon
Cut out Block front wall, score, fold over, and glue
top edges to back side. Cut out base and glue front wall to it.
Cut out left and right end walls, glue to front and base. Cut out
inner walls and glue to front wall. Finally, cut out roofs, fold
and glue to front and sidewalls. |
|
|
BLOCK
8
Undertaker/Cabinet Maker, Platt’s Saloon
Cut out Block front wall. Cut out inset doors of Undertakers,
cut out base and glue front wall onto it. Cut out Undertaker doors/floor
assembly, glue floor flush to front of wall on base and fold up,
then glue to side panels of front wall. Cut out long sidewall for
right end building, glue to front wall and base. Cut out short sidewall
of Undertaker, score, fold over, and glue top edge to back side,
then glue to front wall and base. Cut out short inner wall and glue
to front wall. Cut out flat roof and glue to front and side walls.
Cut out roof, then cut out dormers and glue to where indicated.
Cut out dormer roofs, fold over front edge and glue, then glue to
dormers. |
|
|
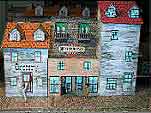
BLOCK 9
House of Refreshment, The Sportsman’s Club, Pearsall &
Fox Hotel
Cut out Block front and glue to base. Cut out short Block end wall,
score, fold over, and glue top edge to back. Cut out right end wall
of building, fold chimney portion together and glue, making sure
chimney is a rectangle. Now, do the same for the short right wall
with chimney and glue to front wall. Cut out short wall, score,
fold over, and glue top edge to back, then glue to Block front wall.
Cut out flat roofs and glue to front and side walls, then cut out
slope roof, fold front edge over and glue. Glue dormer as indicated,
glue the roof to one end, then the other. Finally, glue on dormer
roof and chimney covers. |
|
|
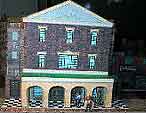
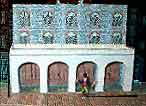
BLOCK
I0
The Atlantic Beer Garden
Cut out Block front. There are two back walls, the Ground Floor,
which will be behind the arches, and the one above. Cut out arches,
score around curved tops and fold side back within. It is advisable
to add thin foam core or other material strips to support them.
Cut out white roof, folding up all four edges, then gluing to the
top back side and ends of the arches. Fold tabs at the feet of the
arches under and glue beneath front floor edge and sides. Now glue
arch roof to upper back wall, under the first row of windows. Cut
out base and glue assembly down. Cut out side walks and gates, glue
these sidewalks to base and gates to the inside of the lower back
wall. Glue on roof to top of upper back wall. |
|
|
BLOCK 11
The Americus Club, The Glass House
Cut
out Block front. Cut out inset door space of Glass House. Score,
fold over, and glue top edge of front wall. Cut out Block front
end walls, score, fold down, and glue top edges to backs. Cut out
base and glue front and end walls to it. Cut out Glass House door
and floor assembly, glue floor to front of building on the base.
Fold sides inwards and glue door assembly inside. Cut out center
wall of Block, score, fold over, and glue top edge to back. Glue
this wall to the Block front wall from within. Cut out roofs and
glue to front wall and sides, then cut out steps and glue under
Americus Club front door. |
|
|
BLOCK 12
Pumper Company Fire House, Cove & Saltem’s Oyster Bar
Cut out Block front of building and glue to base
Cut out end walls of Block, score, fold, and glue top edges to back,
then glue to front wall and base. Cut out inner wall piece, score,
fold over, and glue top edge to back, then glue wall glue to Block
front. Cut out roofs and glue to front and end walls. |
|
|
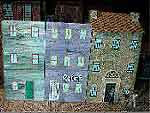
BLOCK 13
Tenement Block
Cut out Block front, score, fold, and glue top
edges to back of each building. Glue Block front wall to base and
cut out end wall pieces. Fold and assemble chimneys, making sure
they form rectangles. Glue long end wall sections to left and right
ends of Block front and base. Cut out short inner walls, again making
sure chimneys are rectangular, and glue to front wall. Cut out flat
roof and glue to front and side walls. Cut out roofs, glue one side
then the other. Lastly, glue on chimney tops. |
|
|
BLOCK 14
“Beds,” Poole’s Butcher Shop, Liquors
Cut out Block front and basement window spaces
in foundation of right end building. Glue Block front to base, then
cut out and fold basement window assemblies. Glue the bottom of
the each assembly inside the foundation space, fold up and glue
the side tabs. Cut out the Block end walls and glue to front and
base. Cut out interior walls, making sure the chimney is a rectangle,
then cut out left side wall and glue to front. Glue flat roof to
front and side walls, cut out slope roofs and glue starting with
one end, then the other. Add chimney tops. |
|
|
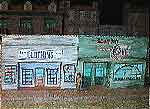
BLOCK 15
Clothing Store, Café
Cut out Block front. Cut out both door insets,
then glue to base. Cut out door and floor assemblies, glue floors
to front of buildings and glue to base. Insert doors, glue to side
tabs of entries. Cut out Block end walls, score, fold over, and
glue top edges to back of wall. Cut out roof and glue to front wall
and sides. |
|
|
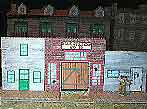
BLOCK 16
(The Black & Tan, Hose Company Fire House, Mad Jack’s)
Cut out Block front and sidewalk. Use foam core
or poster board to build up the base under the building and the
sidewalks. Insert the stone drive in front of the door, folding
up the black section to fit under the door. Cut out the Block end
walls, score, fold over, and glue top edges to back. Mount Block
on its base. Cut out interior walls, score, fold over, and glue
top edges to back. Glue these walls to front of building. The roof
of the Black & Tan and Firehouse is one piece. Cut it out, score
and fold where indicated (creating two different interior wall surfaces
where the buildings “meet.” Glue finished assembly to
Block front and end walls. |
|